What Is Expo Router - File Based Routing?

I have been experimenting with Expo Router, that is, Expo's recently released Expo File Based Routing structure, for about a year now. I noticed that there aren't enough Turkish articles on this topic. Although Expo's documentation is fairly explanatory at a basic level, it wasn't enough for me. It is especially quite weak on the "Shared Routing" part, which is an important topic for managing files well in this file-based routing structure.
Expo Router in Brief
Expo Router is a file-based router for React Native and web applications. It manages navigation between the screens in your app. It offers a file-system-oriented routing system and automatically creates a route whenever a new file is added to the app directory:
Does this structure look familiar from somewhere? Of course it does for React developers. It is NextJS itself. Today NextJS is quite a popular choice for building SEO-friendly web applications. So most frontend developers are comfortable with NextJS or at least know its structure. Even though there are some native differences, when they set up Expo they will run into a very similar structure.
I am skipping the installation part, because it is explained quite clearly and simply in the documentation.
Creating Pages
We create pages just like in React Native, by defining an exported function. There is no difference here.
app/index.js:
import { Text } from "react-native";
export default function Page() {
  return <Text>Home page</Text>;
}
The route above matches the '/' path. Index files inside directories are always treated as the default file. So if we create our page as "settings/index.js" inside app, its equivalent in the router will be "/settings".
Dynamic Routes
app/blog/[slug].js -> matches /blog/123.
app/blog/[…rest].js -> matches /blog/123/settings.
If we define a file named [id].js, in brackets, in a subfolder, it will create a dynamic route:
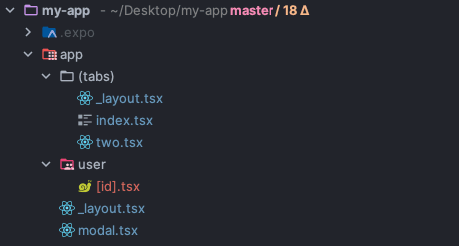
If we add app/user/[id].tsx, it will be equal to user/123 or user/222.
In dynamic pages, we catch the incoming dynamic value inside the page with the useLocalSearchParams hook:
import { useLocalSearchParams } from "expo-router";
import { Text } from "react-native";
export default function Page() {
  const { id } = useLocalSearchParams();
  return <Text>User ID: {id}</Text>;
}
Navigate Between Pages
When we want to navigate to a page, Expo Router provides the "Link" component, just like the "a" tag in HTML. Those who know NextJS will remember this component again.
In the example below there are two examples that go to the "app/about.js" and "app/user/[id].js" pages:
import { View } from "react-native";
import { Link } from "expo-router";
export default function Page() {
  return (
    <View>
      <Link href="/about">Hakkında</Link>
      <Link href="/user/berat">User Profil</Link>
    </View>
  );
}
Using Link with Buttons
By default, the Link component wraps its child elements in a <Text> component. This is quite useful, since we don't have to open an extra component under every Link component, but this may not always be desired. We can customize the component; for that we can use the asChild prop, which passes all properties to the first component opened under the Link component. This child component must support the onPress and onClick props:
import { Pressable, Text } from "react-native";
import { Link } from "expo-router";
export default function Page() {
  return (
    <Link href="/other" asChild>
      <Pressable>
        <Text>Home</Text>
      </Pressable>
    </Link>
  );
}
What Is Native Navigation?
It is important to understand the native navigation system, because navigation logic in native is a bit different from the web. I will try to explain it simply. As its name suggests, Expo Router works with a stack logic. For example, you first went to the "/settings" page, then moved on from there to the "/user" page. Then you moved to the "/about" page. As a result, all of these pages pile on top of each other as a "stack". Then if you go back to /settings, the stack is unwound back to /settings.
Navigating to Dynamic Routes
Dynamic routes and query parameters can be provided statically or with an Href object.
Href object example:
import { Link } from "expo-router";
export default function Page() {
  return (
    <View>
      <Link
        href={{
          pathname: "/user/[id]",
          params: { id: "bacon" },
        }}
      >
        View user
      </Link>
    </View>
  );
}
Static example:
import { Link } from "expo-router";
export default function Page() {
  return (
    <View>
      <Link href="/user/bacon">View user</Link>
    </View>
  );
}
What Are Pushing and Replacing?
The difference between **<Link push href="/feed">Login</Link>** and **<Link replace href="/feed">Login</Link>** determines the navigation behaviors used in Expo Router.
Push:
**<Link push href="/feed">Login</Link>**: This means a link navigates to a specific route and adds that route onto the stack. That is, when going to the /settings route, it adds this route to the top of the stack. This is useful for keeping the history of each path while the user moves back and forth between routes, and for giving the user access to past routes when they want to go back. Example usage:
import { Link } from "expo-router";
export default function Page() {
  return (
    <View>
      <Link push href="/feed">
        Login
      </Link>
    </View>
  );
}
Replace:
**<Link replace href="/feed">Login</Link>**: This, while navigating to a specific route, replaces the current route in the stack with the new route. That is, when navigating to the /feed route, it completely replaces the current route and adds the new route onto the stack. This is generally useful when users don't want to keep track of past routes while moving from one route to another, and it prevents the stack from growing continuously. Example usage:
import { Link } from "expo-router";
export default function Page() {
  return (
    <View>
      <Link replace href="/feed">
        Login
      </Link>
    </View>
  );
}
In short, **<Link push>** adds the current route onto the stack, while **<Link replace>** replaces the current route in the stack with the new route.
"Replace" is not always supported in native navigation. For example, on Twitter you can't "replace" from a profile page to a tweet, because the profile page on Twitter is a tab screen and, due to the user UI experience, the user needs to be able to return to the tab screen. In this case, replace switches to the "/feed" tab and adds the tweet route on top of it, or if you are on a different tweet in the "/feed" tab, it replaces the current tweet with the new tweet.
Router Object for Navigation
It is not mandatory to use the "Link" component when navigating between pages. Instead, we can use the "router" object, also provided by Expo Router:
Push:
import { router } from "expo-router";
export function logout() {
  router.push("/login");
}
Replace:
import { router } from "expo-router";
export function logout() {
  router.replace("/login");
}
All the functions supported by the "router" object are as follows:
- navigate: Navigates to a page via a specified address (href).
- push: Adds the current page to the history stack and adds a new page at the specified address.
- replace: Removes the current page from the history stack and adds a new page at the specified address (href).
- back: Returns to the previous page.
- canGoBack: Returns a boolean value. It returns true if there is a valid history stack and the back() function is able to go back. That is, it checks whether going back is possible.
- setParams: Updates the query parameters of the selected route. That is, it is used to update the query parameters of a specific route.
Creating Tabs and Stacks with Layout
In Expo Router we create our tabs and stacks inside layouts. For layout files to be detected by Expo, we need to add "_" at the beginning. initialRouteName, that is, the page we want to open when the app first loads, we set as (tabs).
app/_layout.js:
import { Stack } from "expo-router";
function RootLayoutNav() {
  return (
    <Stack>
      <Stack.Screen name="(tabs)" options={{ headerShown: false }} />
      <Stack.Screen name="modal" options={{ presentation: "modal" }} />
    </Stack>
  );
}
As you can see here, we defined two routes, (tabs) and modal. Inside the (tabs) folder we will have our tabs screen structure. First we create our modal page under app.
app/modal.js:
import { StyleSheet } from "react-native";
import { View, Text } from "react-native";
export default function ModalScreen() {
  return (
    <View style={styles.container}>
      <Text style={styles.title}>Modal</Text>
    </View>
  );
}
const styles = StyleSheet.create({
  container: {
    flex: 1,
    alignItems: "center",
    justifyContent: "center",
  },
  title: {
    fontSize: 20,
    fontWeight: "bold",
  },
});
Then we create our (tabs) folder and create our _layout.js file under it. In Expo Router, the Tabbar is created by using Tabs.Screen components inside the Tabs component.
app/(tabs)/_layout.js:
import React from "react";
import FontAwesome from "@expo/vector-icons/FontAwesome";
import { Link, Tabs } from "expo-router";
import { Pressable } from "react-native";
export default function TabLayout() {
  return (
    <Tabs>
      <Tabs.Screen
        name="index"
        options={{
          title: "Tab One",
          headerRight: () => (
            <Link href="/modal" asChild>
              <Pressable>
                <FontAwesome
                  name="info-circle"
                  size={25}
                  color="black"
                  style={{ marginRight: 15 }}
                />
              </Pressable>
            </Link>
          ),
        }}
      />
      <Tabs.Screen
        name="two"
        options={{
          title: "Tab Two",
        }}
      />
    </Tabs>
  );
}
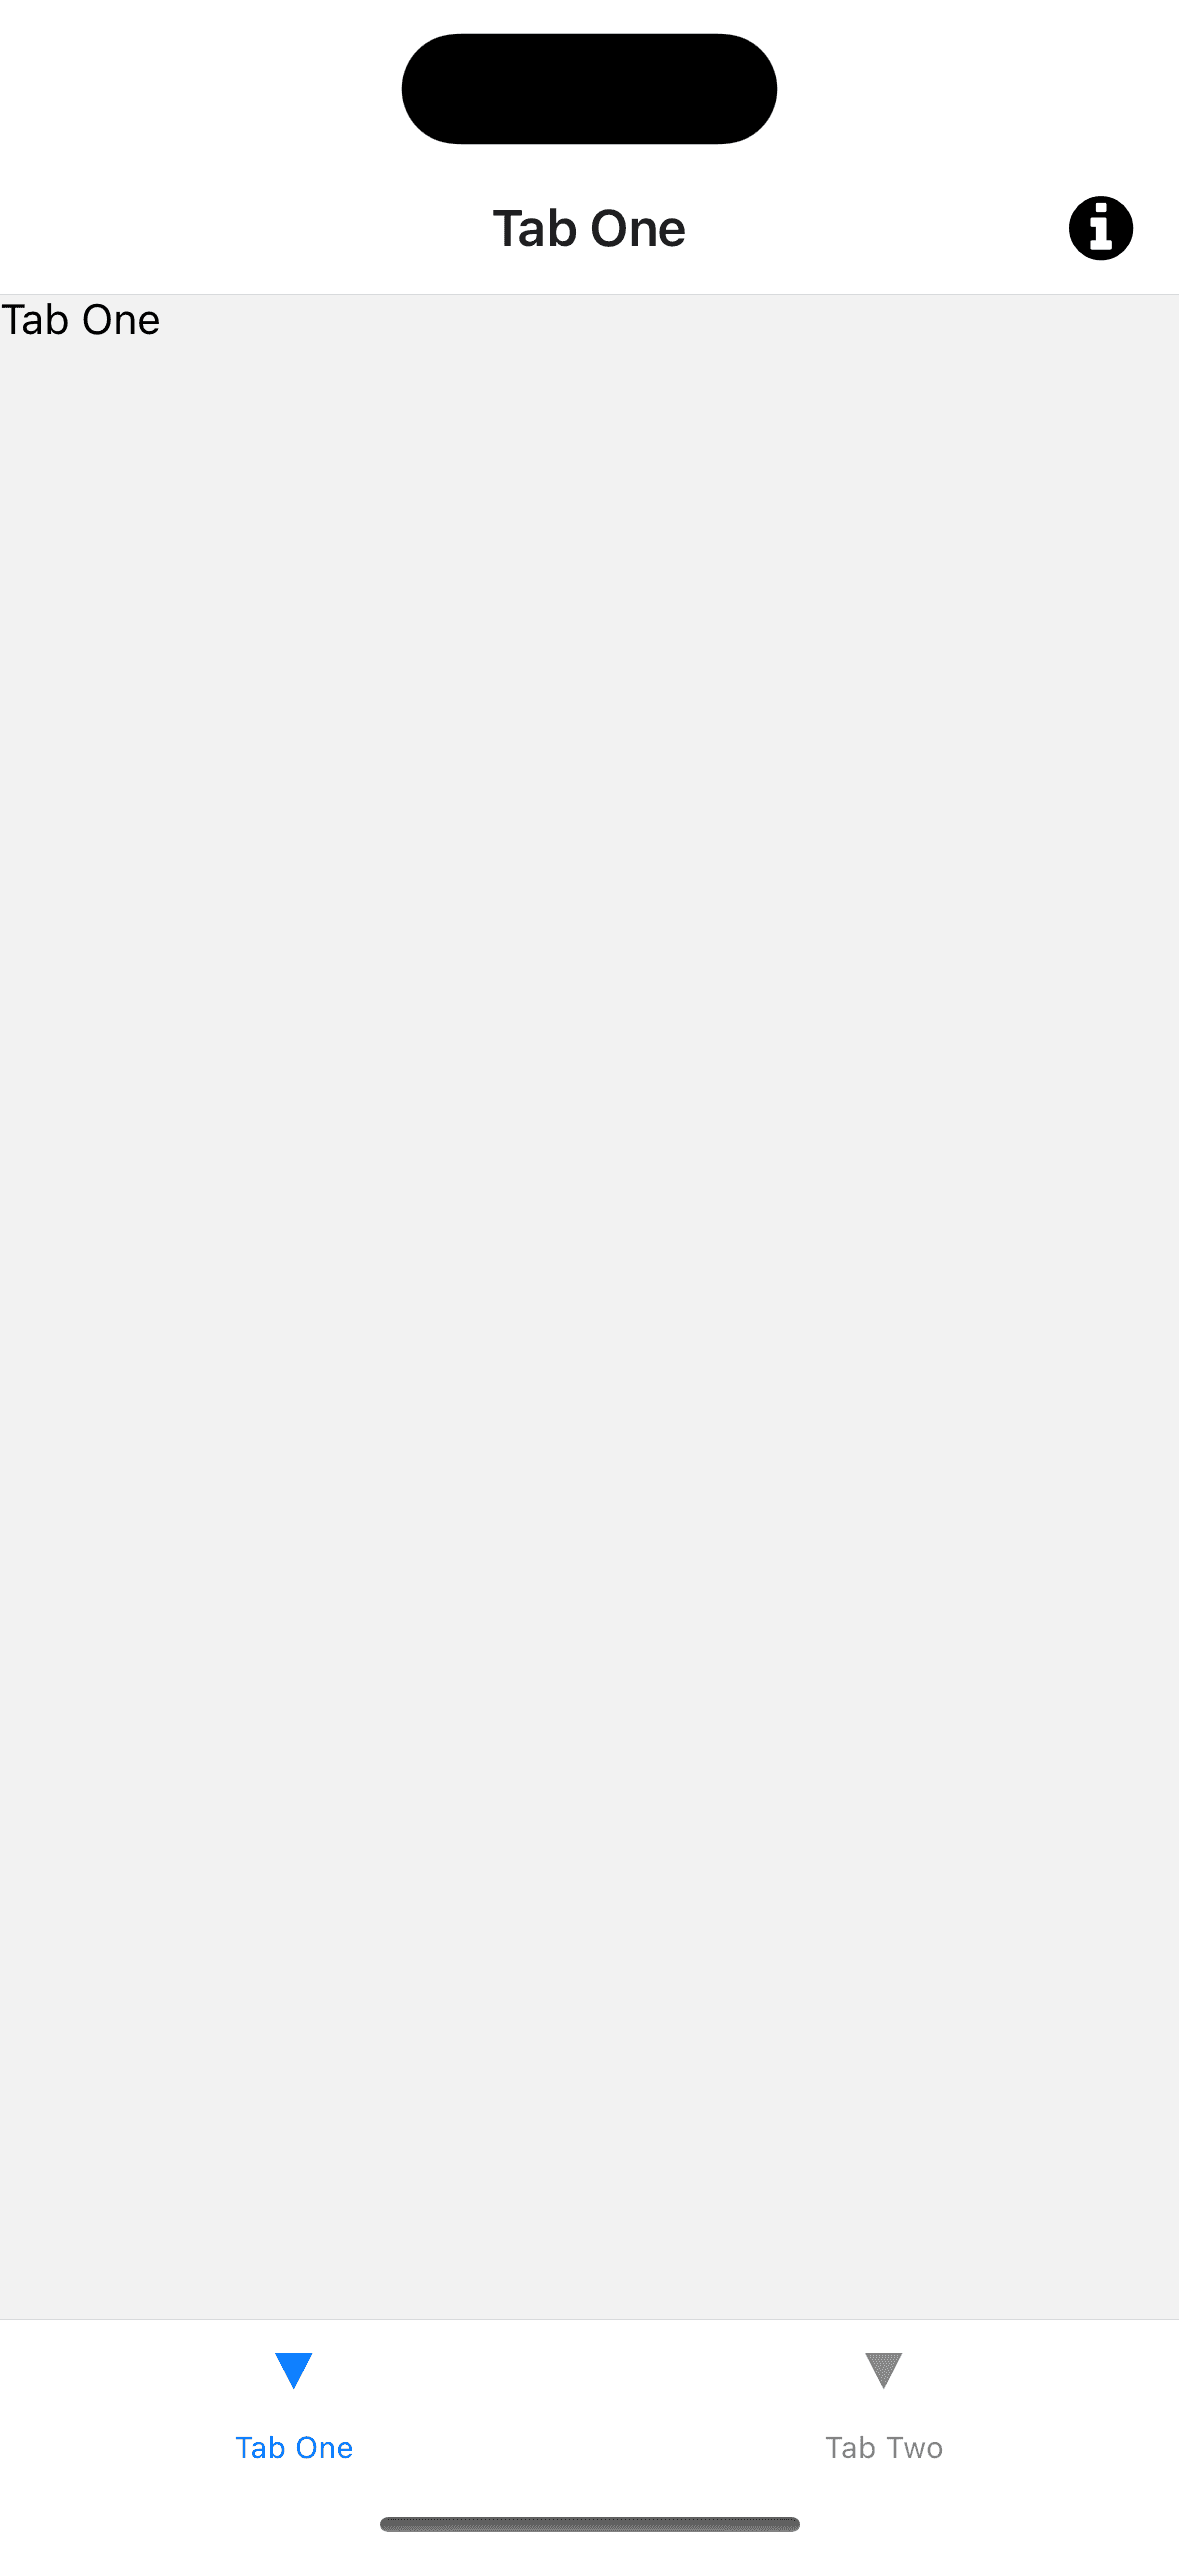
We have done our Tabs definition. Here we also set initialRouteName as index. In addition, in the headerRight part we set up a button to go to the modal we defined as app/modal.js. We navigated with the Link component.
Every file created inside "()" parentheses is a grouping method in Expo Router. They are not included when routing. For example:
The (tabs)/blog file is equal to "/blog" in the router. The file we create as (tabs)/about is equal to the "/about" route.
To explain with code:
router.push('(tabs)/blog') ❌
router.push('/blog') ✅
We can create our pages as index.js and two.js under the (tabs) folder. The file structure will finally look like this:
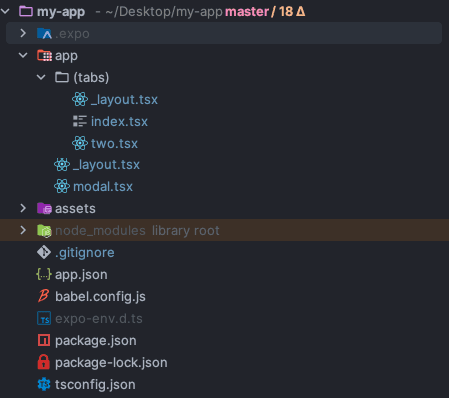
If we start our app in the simulator, it will look like this:
Let's also create a dynamic page and navigate from our Tab One, that is, the app/(tabs)/index.js page, to our dynamic page. Let our dynamic page be app/user/[id].js:
Let's define our page inside app/layout.js:
function RootLayoutNav() {
  return (
    <Stack>
      <Stack.Screen name="(tabs)" options={{ headerShown: false }} />
      <Stack.Screen name="modal" options={{ presentation: "modal" }} />
      <Stack.Screen name="user/[id]" />
    </Stack>
  );
}
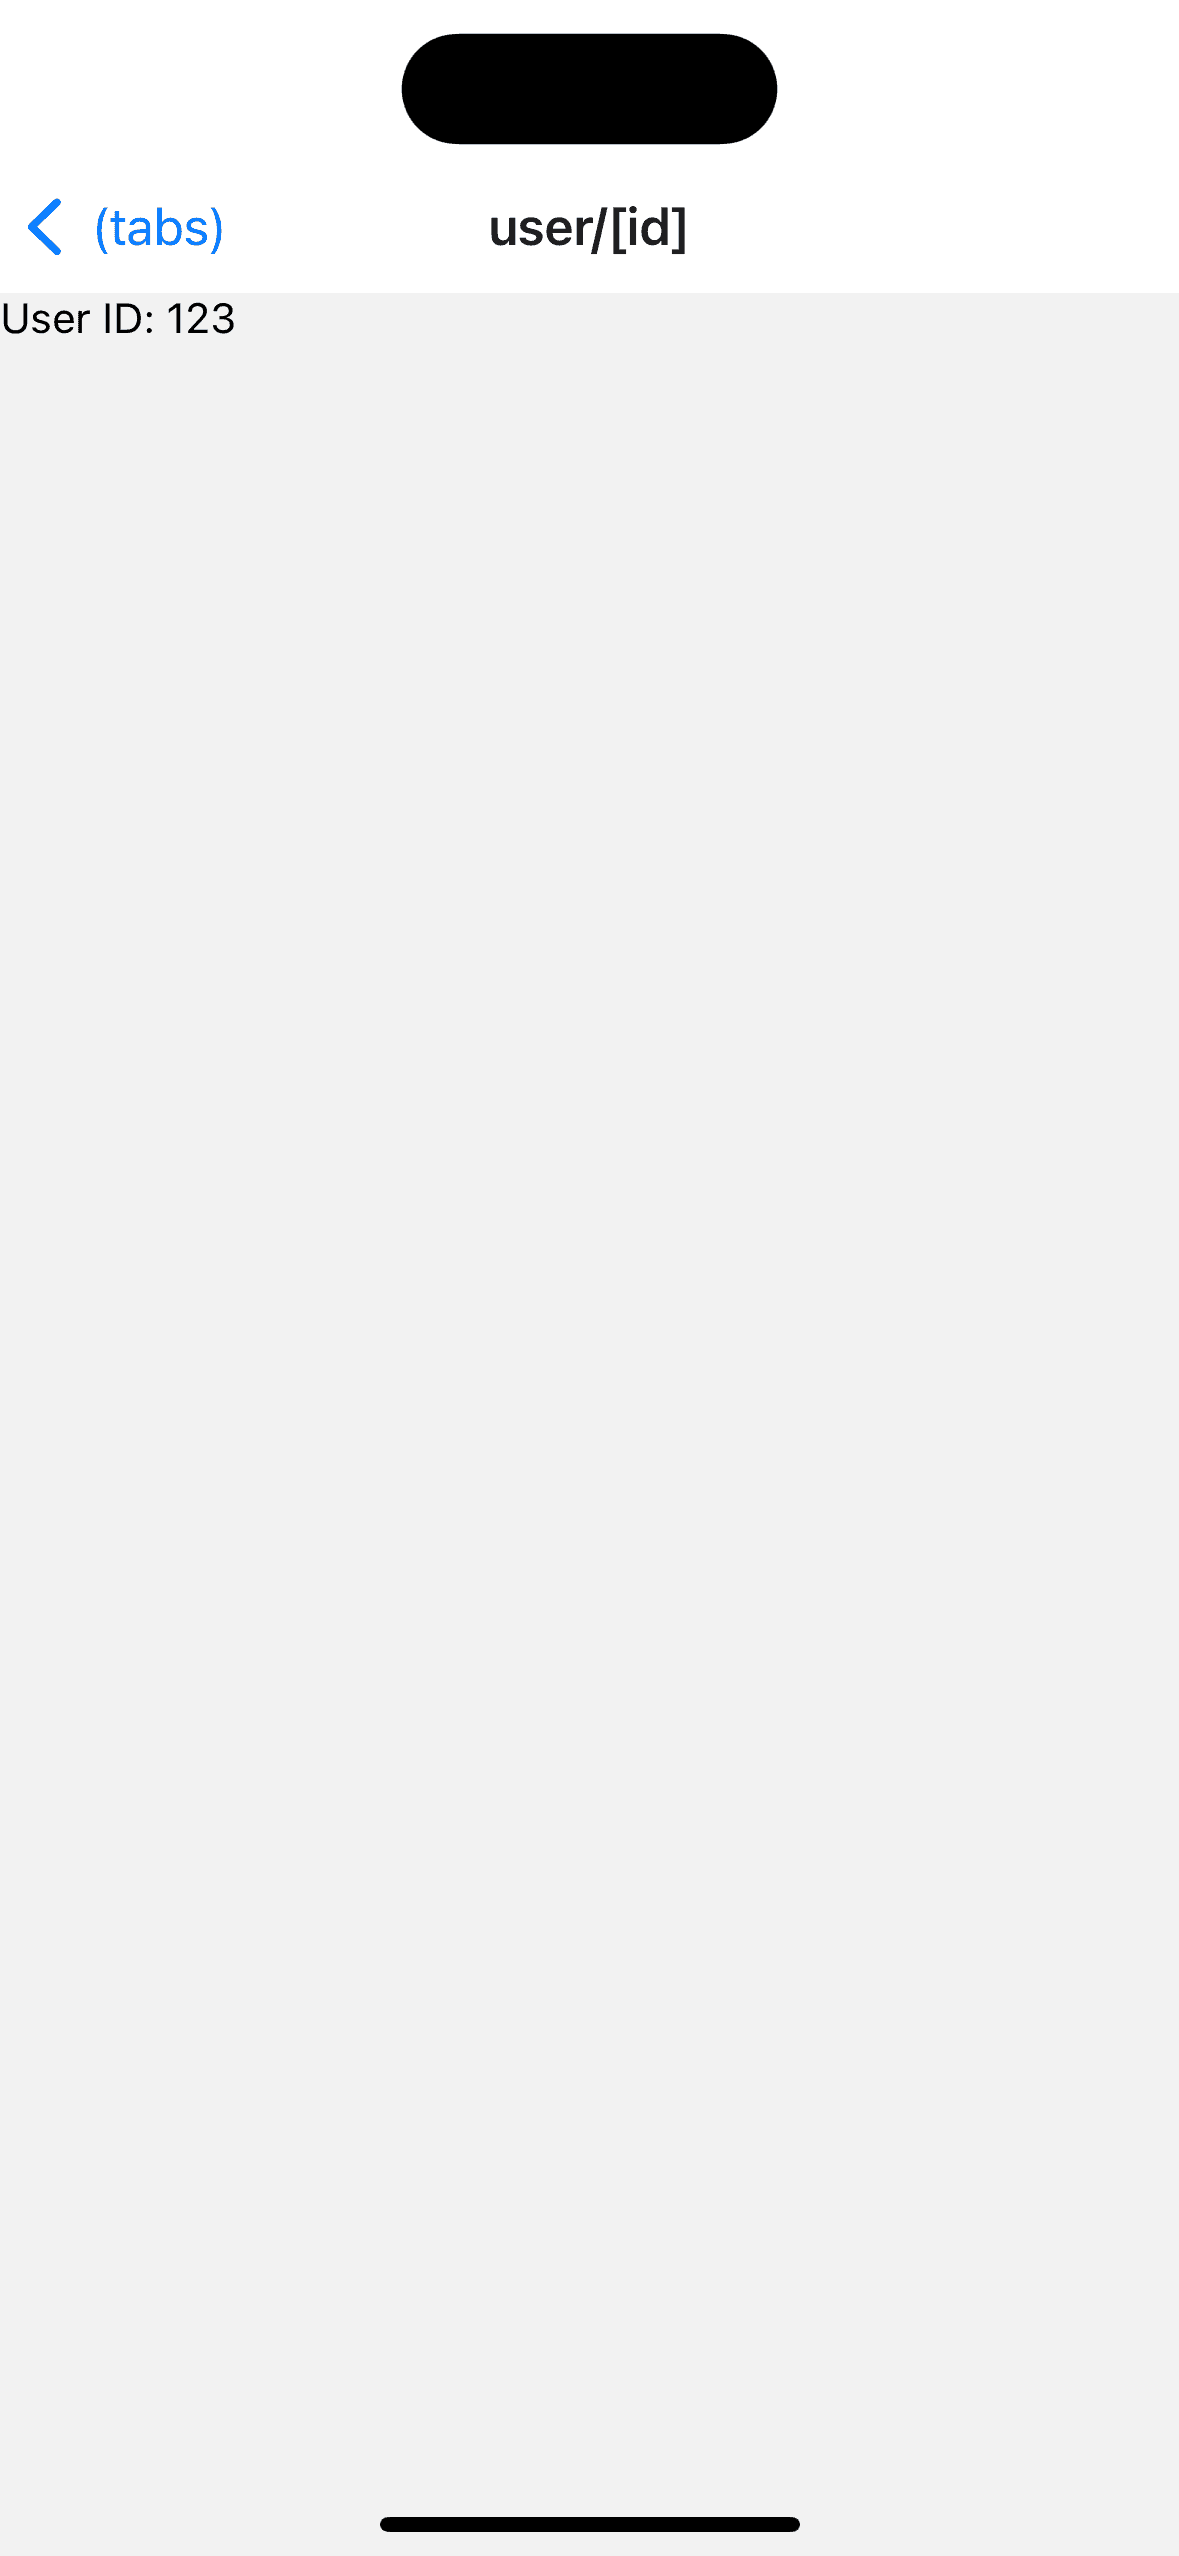
Let's create our page inside app/user/[id].js, catch the incoming id value with useLocalSearchParams and print it inside the jsx:
import { Text, View } from "react-native";
import { useLocalSearchParams } from "expo-router";
export default function UserScreen() {
  const { id } = useLocalSearchParams();
  return (
    <View style={{ flex: 1 }}>
      <Text>User ID: {id}</Text>
    </View>
  );
}
Let's set up the navigation inside Tab One:
import { Text, View } from "react-native";
import { Link } from "expo-router";
export default function TabOneScreen() {
  return (
    <View>
      <Text>Tab One</Text>
      <Link href="/user/123">User Profiline Git</Link>
    </View>
  );
}
Finally, when we click the "User Profiline Git" (Go to User Profile) button, our user page will open:
Groups
As we mentioned under the Creating Stacks heading, we can group the pages we create in Expo Router. We can do this by creating files inside "()" parentheses. Files created inside parentheses are not included in the route, and this is exactly where the grouping method gets nice:
Under our app folder we created two group folders named (aux) and (settings) and defined our pages inside them. The nice thing about grouping is that when we want to go to these pages, we can go directly to "/notifications", not "(settings)/notifications". As we said at the beginning, folders opened inside parentheses are group folders and are not included in the route path.
We define the pages we created inside app/_layout.js:
function RootLayoutNav() {
  return (
    <Stack>
      <Stack.Screen name="(tabs)" options={{ headerShown: false }} />
      <Stack.Screen name="modal" options={{ presentation: "modal" }} />
      <Stack.Screen name="user/[id]" />
      <Stack.Screen name="(aux)/privacy-policy" />
      <Stack.Screen name="(aux)/terms-of-service" />
      <Stack.Screen name="(settings)/notifications" />
      <Stack.Screen name="(settings)/themes" />
    </Stack>
  );
}
We set up the navigation inside app/(tabs)/index.js:
import { Text, View } from "react-native";
import { Link } from "expo-router";
export default function TabOneScreen() {
  return (
    <View>
      <Text>Tab One</Text>
      <Link href="/user/123">User Profiline Git</Link>
      <Link href="/notifications">Notification Settings</Link>
    </View>
  );
}
As you can see, we navigated to the "/notifications" page and didn't add any path in front of it. This will navigate to our page under "app/(settings)/notifications.js".
We'll wrap up here for now 🙂 In my next post I will explain the "Expo Router — Shared Routing" structure. I hope I was able to explain it clearly. If you liked it, don't forget to clap clap 🙂