Laravel Expo Push Notification
We have recently been building an app using Laravel and React Native. Alongside React Native we use Expo as a helper, and what Expo offers is really incredible.
Since we wanted to integrate Push Notifications into our app, we decided to use Expo's Push API. I couldn't find enough Turkish resources on the internet, and honestly I can say I couldn't find any at all. So I decided that once I had integrated it into my own system on Laravel, I would share it and talk about my experience. Those of you who don't use Laravel, don't be afraid, because I actually wrote plain PHP and created and used my own class. So what I'm going to explain isn't any Laravel package. We will use the PHP library that Expo's documentation recommends.
The logic:
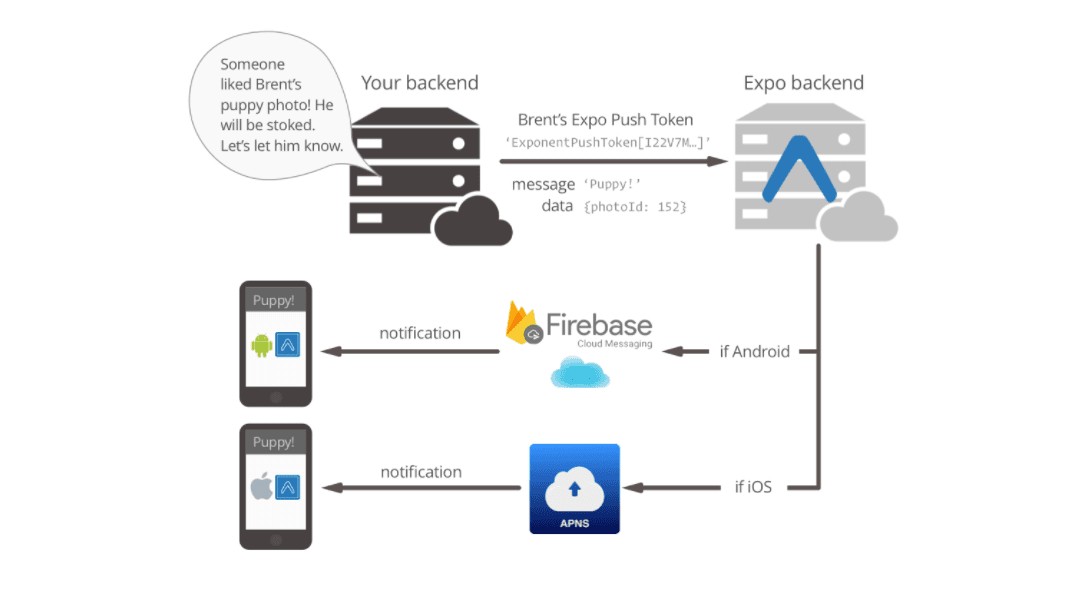
First of all, the push notification logic is explained in a very simple way in the documentation. After getting notification permission from the user, the frontend person gets the user-specific, unique Expo push token. After getting this unique token, you send it to Expo's server along with the message and data you created. Since these tokens also exist on Expo's side, it matches them internally and sends the notification to the relevant devices. Because these tokens are created specifically for those devices.
So what are this message and data? Which parameters does the Expo Push API ask of us?
You can look at its documentation but I still want to give a summary. Actually, I can say it is almost no different from the PHPMailer library we often use in PHP or Laravel's Mail class. The parameters are as follows:
to: The token of the recipient. It can take one or more tokens. You can send it as an array or a string.
title: You know, the heading of the notifications that arrive on our phones every day. It takes a normal string.
body: Again, the description part of the notifications that land on our phones every single day. This also wants a string.
data: Of course, you can also send data along with the notifications you send. For example, you can send the id of the profile you want your frontend to navigate to when the notification is tapped inside data. That way, on the Expo side the frontend can catch it and route accordingly. The imagination is limitless on this.
ttl: I haven't used it and haven't seen it used in any app, but in short it lets you set a lifespan for the notification you send. Think of it like the cookies we use in the browser. We could give them a certain time and then have them delete themselves. Same logic.
sound: To play a sound with the notification you send. I send it as default. According to what Expo says, it doesn't support custom sounds. Maybe there are other ways.
It has many more parameters, but these are the most important ones. You can look at its documentation for more detail.
Let's Move On to Using the Package: ctwillie/expo-server-sdk-php
Of course, you can also do your operations with plain cURL as offered in Expo's documentation, but when we have a library that offers cleaner code, why would you want to use curl?
With use, we include our Expo and ExpoMessage classes.
use ExpoSDK\Expo;
use ExpoSDK\ExpoMessage;
We have two options when sending our message. You can send it as a method, like setTitle:
$message = new ExpoMessage();

$message->setTitle('Facebook')
    ->setBody('Bir yeni yorumunuz var.')
    ->setData(['id' => 1])
    ->setChannelId('default')
    ->playSound();
or you can send it directly inside our object as "title" within an array. I prefer sending it as an array:
$messages = [
    new ExpoMessage([
        'title' => "Instagram",
        'body' => "5 Beğeniniz var.",
        "to" => $friendToken,
        "sound" => "default",
        "data" => $data
    ]),
];
I think it's neater. By the way, as I did, you can send the "to" parameter directly inside the Message. If you want to send to a single person, this is neater.
Then, if our message is ready, we move on to sending. We do this by passing our $messages array to the send function of the Expo class, and finally we add our push() method:
(new Expo)->send($messages)->push();To send the same notification to multiple people, we can use to. As you know, to could take an array:
$tokens = ["token1", "token2", "token3"];

(new Expo)->send($messages)->to($tokens)->push();
That's it! With just these steps you have integrated Push Notifications into your app.
Additionally:
All well and good, but what's this channel id business? Why does Android want it?
First of all, channel id is not a parameter you are required to send. You can just send it directly as "default". So what is it?
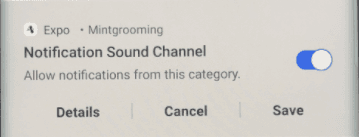
On the Android side, unlike iOS, you can add notification types to the app settings in Android's own settings section. However, iOS doesn't have such an option for now; users can only go into your app from settings and turn off general notifications entirely. But on the Android side, if you create your channel ids, the user can turn the notification types you offer on and off from this section:
That's all I had to say about Expo Push Notification. If I made any mistakes, forgive me. Thanks.
References
https://docs.expo.dev/push-notifications/sending-notifications